Thursday, 17 March 2016

No DVD Drive or Missing DVD Drive after upgrading to Windows 10

If you've upgraded a PC to Windows 10 and the DVD drive has seemed to disappear, you might find simply uninstalling the drive in Device Manager and then rebooting the PC brings the drive back.

However if it doesn't, then try the following;


  • Press the Windows Key and type "regedit" to open the Registry Editor
  • Browse to the following registry key - HKEY_LOCAL_MACHINE\SYSTEM\CurrentControlSet\Control\Class\ {4D36E965-E325-11CE-BFC1-08002BE10318}


  • Look for "LowerFilters" and "UpperFilters". You might only see one of these, either way delete them
  • Close the Registry Editor and restart the PC
  • The DVD drive(s) should now be available again

Friday, 12 February 2016

Windows slow after upgrading to Windows 10 from Windows 7 or 8

If you've upgraded Windows from Windows 7/8 to Windows 10 and finding the system slow, try following the steps below.
  • In the first instance, try disabling Real-Time protection in Sophos on the PC to see if things improve. If there is no difference, leave the real-time protection off for the time being.
  • In Task Manager, order by high-disk usage at the top
  • Look for "Service Host: Local System (Network Restricted)" and monitor it's disk usage for a few seconds.

    If it's usage is high, then press the Windows key, and type Services, and open. Find "Superfetch", stop the service, and then go into it's Properties, and change the Start-up method to "disabled".

    Monitor the Service Host:Local System (Network Restricted) service to see if it's disk usage goes down. If it doesn't, or it does but disk usage is still high, move onto the next step
  • Look for the process "Antimalware Service Executable" and monitor it's usage. This is the process for Windows Defender - it will continue to run even if you open Windows Defender and turn Real-Time protection and everything off. If you try and stop the service, you get a "Access is deniet" message. Assuming after some monitoring this service's disk usage is quite high, follow the next step
  • Press the Windows key, and type "Local group policy" and it should bring up a shortcut to the Local Group Policy Editor, "Edit group policy". Open it.
  • In the Local Group Policy Editor window, expand "Computer Management", and then "Administrative Templates" and then "Windows Components".

  • Expand "Windows Components" and click on "Windows Defender". 

  • Double-click "Turn off Windows Defender", and in the Window that opens, click "Enabled" and then Apply and then close the group policy editor.
  • Now Windows Defender is turned off to stop the Antimalware Service Executable running, and Superfetch has been disabled to dramatically decrease the disk usage of Service Host: Local System (Network Restricted) service.
  • Monitor the running processes for a couple of minutes, whilst opening one or two programs or explorer windows to make sure things have sped up a bit and that the processes above are not running.

Thursday, 12 March 2015

Allow Non-Administrators to Start/Stop Services in Windows 7/8/Server

Sometimes you want a user to have the ability to start/stop services for certain software, but without giving their account the required administrator privileges. The guide below will help you grant permissions for a non-administrator account to have the ability to start and stop a particular chosen service in Windows 7, Windows 8, Windows Server 2008 and Windows Server 2012.

- Click Start, Run and type "mmc.exe"
- Microsoft Management Console opens, once this happens, click File then Add/Remove Snap-in


- Choose "Security Configuration and Analysis" from the list and Add
- Choose "Security Templates" and Add, then Click OK.

We now need to create a blank security template.

- Firstly, create a folder in the root called "Security", e.g. C:\Security
- Go back into the Microsoft Management Console (MMC) and right-click "Security Templates" and then "New Template Search Path".
- Choose the newly created Security directory, e.g. C:\Security and click OK
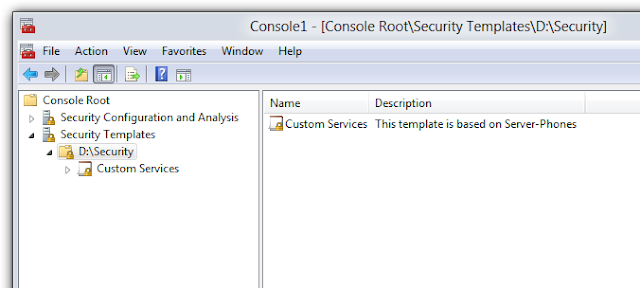
- Right-Click C:\Security from the console tree on the left and click "New Template" and give it a name, I'll name it "custom services". Click OK


- Right-Click on the "Security Configuration and Analysis" option on the left, and select "Open Database". Browse to C:\Security (or whatever the name of the directory you created previously is) and name the database "Security". Click OK to create a Security.sdb file which is used to apply the changes.
- After clicking OK, an "Import Template" screen comes up - browse to C:\Security and choose "custom services.inf". This will then apply the template with all the local services to the database.
N.B. If you get an error at this point, then you need to go back to the start and create the security templates on a local disk
- Now Right-Click "Security Configuration and Analysis" again and choose "Analyze Computer" and accept the default log path. Then you will see a screen that looks similar to the below


- Now double-click System Services, and scroll down to find the service you want to change stop/start permissions for, e.g. Fax
- Double-Click and tick the "Define this policy in the database" box and then the click the "Edit Security button


- Click Add, and type in the username of the account you want to modify permissions for, then click OK
- Now with the username selected, check the "Allow" permissions for "Start, Stop and Pause" and click OK and OK again


- You'll see a red "x" next to the service because the permissions for it conflict with the local computer permissions, so we now need to apply the new security permissions
- Right-click "Security Configuration and Analysis" from the left and then "Configure Computer" and then click OK.
Now the new permissions should be applied, test to make sure it works, and if it doesn't double check you followed all the steps correctly all the way through

Wednesday, 11 March 2015

Windows Update Cannot Check For Updates

If you're getting the error message "Windows Update cannot check for updates because the service is not running" when you try and run Windows Update, then follow the steps below to attempt to get it working again.
- Firstly, check that you still have the Windows Update Service installed, by going to Control Panel > System & Security > Administrative Tools > Services. Or simply by typing "services.msc" in the Run menu, or in the Start menu in Windows 8.
(click for bigger photo)
Windows 8
- Look for the service "Windows Update". If it is there, right-click and choose Start. If it starts successfully, try running Windows Update again. If it's disabled, double-click it and change start-up type to "Automatic" and try running Windows Update again.
- Assuming the service is missing, then its likely that the registry entry in Windows for the Windows Update Service has become corrupt or been deleted - some viruses do this. (it may be you've had this problem after having a virus).
- Open the Registry Editor by typing "regedit" into the Start menu, and click File > Export to create a backup of the registry - export it to a directory you'll remember (in the root of C: for example)
(click for bigger photo)
- Once the registry has been backed up, browse to HKEY_LOCAL_MACHINESYSTEMCurrentControlSetServices and look for a key in the left-hand column called "wuauserv". Most likely the key isn't there, or it is empty.
- Import the missing key by downloading it below and installing it onto the problem PC by double-clicking it.
Windows Update Service Win7 x64.reg - Right-Click and Save-As.
- Check the key has installed successfully by browsing to HKEY_LOCAL_MACHINESYSTEMCurrentControlSetServices again and checking the "wuauserv" is in the left-hand column and that it has entries in it.
(click for bigger photo)
- Restart the PC and try running Windows Update again, and it should be working.
- If update works but they fail to install, follow the steps in here in my other post to clear the Windows Update cache, logs and downloaded files.

Windows Update Failing - Windows 7 / Windows 8

If you're Windows Updates are constantly failing, then try out the steps below.
- Stop the Windows Update Service. Open the Control Panel, browse to System & Security > Administrative Tools and open Services. Alternatively, type "services.msc" under Start > Run, or in Windows 8, simply hit the Windows key to use the Start menu and type "services.msc" and press Enter.
(click for bigger photo)
Windows 8
- Find the service "Windows Update". Right-click and choose "Stop" to stop the service running. Minimize the Services console.
(if there is no Windows Update service listed, see my other blog "Windows Update Service is missing")
(click for bigger photo)
- Open My Computer or Windows Explorer and browse to C:WindowsSoftwareDistributionDatastore and delete everything within this folder
(click for bigger photo)
- Then browse to C:WindowsSoftwareDistributionDownload and delete everything within this folder.
(click for bigger photo)
- Go back into the Services console and Right-click Windows Update and choose "Start" to restart the Windows Update service.
- Go back into Control Panel > System & Security > Windows Update. If you've followed the above steps correctly, it will say "Last check for updates: Never". If this is so, click "Check for updates". It should find new updates and with a bit of luck, updates will download and install successfully.

Friday, 9 September 2011

Windows 7 - Lost desktop icons, User files, Documents, Settings - Corrupt User Profile

I was recently asked to fix a laptop that seemed to have a corrupt User Profile on Windows 7. For no apparent reason, the user booted up his laptop one day, entered his password as normal only to see a "Preparing Desktop" message appear (like you get before logging onto Windows for the first time on a new User Account) before loading up his desktop, minus his custom shortcuts, desktop files, and everything under his user area seemingly disappeared. Various application shortcuts didn't work and in general it looked like it was a brand new User Account desktop...except it wasn't.

Googling this issue came up with various suggestions and supposed fixes, some which had no effect on fixing this issue. The method below is how I fixed it, but check my checklist as not all logon problems are the same, so you may have a different problem to what I was presented with.

Symptoms I had were;

  • "Preparing Desktop" at logon, when logging onto a User Account thats been used before
  • Desktop looking standard - no custom icons, shortcuts or files stored on the desktop not visible
  • In the User area (C:Usersusername, used to be My Documents) - all folders are empty
  • Certain applications may have lost their configuration and appear to be loading as if they hadn't been run before.
At this point it's worth mentioning that this is no reason to panic - you're files etc are still on the PC, but your User Profile has become corrupt so they're not visible. Browsing to C:Usersusername will show you your files are still there, but going to the User Area from the Start Menu or Desktop will show it as empty. If you click into the Address Bar you'll notice the reason - it will show "C:Windowssystem32configsystemprofile" or something similar. Now you could copy all this files back over but it wouldn't fix the problem entirely, or you could create a new profile and copy the data back over to that.
However, it's quicker and makes more sense to follow the steps I carried out, which I will now explain - click images to enlarge in a new window.

First, we need to open the Registry Editor. Click "Start" and type "regedit".
Now we need to make a backup of the Registry. Do this by clicking "File" and then "Export" and choosing somewhere you'll remember to save it.
Now navigate to the following location in the Registry;
HKEY_LOCAL_MACHINESOFTWAREMicrosoftWindows NTCurrent VersionProfileList
Look for the key starting S-1-5 with a long number followed by it. Click it and you'll see in the right-pane that the "ProfileImagePath" is set to "C:UsersTEMP" - this is part of the problem, it should be related to the user, in my particular case it should be "C:Usersmartin".


In the left-pane there should be an indentical key under "ProfileList" but with ".bak" at the end of it.


If you click this, in the right-pane you'll see the "ProfileImagePath" is correct, and there's more subkeys.


We need to restore this key.
Click the incorrect key in the left-pane and rename it by adding ".bak2" to the end of it.
Now click the correct key (the one with ".bak" at the end of it) and remove the ".bak" from its name.
Exit the Registry Editor and restart your computer. After logging back in, desktop files, shortcuts etc and folders and files in the User area should be restored. Any shortcuts to applications should work again.
If you have Microsoft Outlook, it may need to be reconfigured and any local .pst files be imported again.

Tuesday, 5 July 2011

How to Import an .NK2 (nickname) file into Outlook 2010

So maybe you've recently upgraded to Outlook 2010 and you've migrated your old mailbox folders, contacts etc and set up your email account(s) but you're missing one thing - the handy tool that comes up with previously used email addresses as suggestions when typing in the recipient's box when sending an email.
This AutoComplete "nickname cache" is stored as an ".nk2" file in versions of Outlook up to Outlook 2007. Outlook 2010 doesn't use .nk2 files - so simply copying the .nk2 folder into the relevant Outlook folder on your new PC or clean install won't get the AutoComplete working.
For some people this isn't an issue as they don't send that much email or they use their contacts/address book all the time. But this is an issue in most corporate environments, especially for Sales people or people who send out a lot of email - the thought of having to start remembering full addresses, spelling of contact names, or going through their Outlook contacts to find someone for emails again is enough to make you cry. Ok, maybe not, but it's frustrating to say the least.
However! You can import your old AutoComplete into Outlook 2010 and keep all your stored nickname cache addresses and remain sane.
Note: Outlook 2007 and earlier store the .nk2 file in the following folders by default;
Windows XP:
C:Documents and SettingsUsernameApplication DataMicrosoftOutlook
Windows Vista / Windows 7:
C:UsersUsernameAppDataRoamingMicrosoftOutlook
If setting up a new computer (or clean install of Outlook 2010 and not an upgrade);
1) Install Outlook 2010 (or Office 2010 with Outlook)
2) Create an Outlook profile by running Outlook 2010 for the first time and setting up your mailbox account(s).
3) It will probably be worth enabling "view hidden files and folders" on your machine so you can identify the .nk2 file correctly.
4) Find the .nk2 file on your old PC from the relative data path. Make a note of the name of the .nk2 file - this is usually Outlook.nk2. If you created and used an Outlook profile with a different nam though, you'll want the to find the .nk2 with the same name.
5) Copy the .nk2 file from your old PC and paste it into the relative data path on your new PC.
6) Make sure Outlook 2010 is completely closed.
 
Go to the Start Menu.
In Windows Vista/7, type: outlook.exe /importnk2
In Windows XP you'll need to choose Run after clicking Start
 
Outlook 2010 should now open with your AutoComplete nickname cache imported. Test it out to check by starting to type an email address you commonly used on your old PC. If it doesn't make suggestions, then double-check all the above steps and repeat any if neccessary!
 
Upgrading to Outlook 2010 (or Office 2010 with Outlook);
 
From experience, when upgrading Outlook it automatically does the importing of the AutoComplete into Outlook 2010 for you. However, if you find it isn't then try the following;
 
1) Double check the name of the .nk2 file is the same as the Outlook profile.
 
2) Repeat Step 7 above
 
Hope this helps.